
Grapes and leaves - an update
I've been a sporadic blogger at best for the last few months with nothing much happening on the stitching front. I've done bits and pieces but nothing for any length of time. Saturday just gone was one of our JE day classes and although I take my embroidery with me I'm concentrating on the students so I don't usually get much done. This weekend however, due to the weather here in Manchester, there was only one student so I did get some stitching done.
I started the new Module 8 piece for the Japanese Embroidery Academy. I'd done the design and the transfer ages ago but it got sidelined and for weeks I've been having second and third thoughts about the colours. On Saturday morning I spent some time looking at the original inspiration for the piece and the threads I'd chosen and decided that I'd chosen the correct colours in the first place, so I made a start. The piece is in fuzzy effect, there isn't much to see yet so no pictures. I did some more on Sunday but once the light started to fade I moved onto Grapes and Leaves. The stitching mojo seems to be coming back, hopefully I'll be stitching regularly from now on.
I have done some work on grapes and leaves since I last blogged, it's slow work because the motifs are so big & they take ages to embroider. When I last wrote about the grape leaves piece I'd completed this big leaf and started the one on its right which is just an outline.

My first attempt at this one was to couch down padding cotton and cover this with flat silk in a diagonal layer.
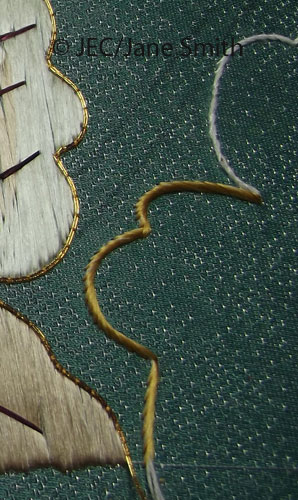
I decided I didn't like this as it was too skimpy and mean next to the other leaves. I tried more padding cotton and a wider diagonal to give a bigger outline but I didn't like either variation.
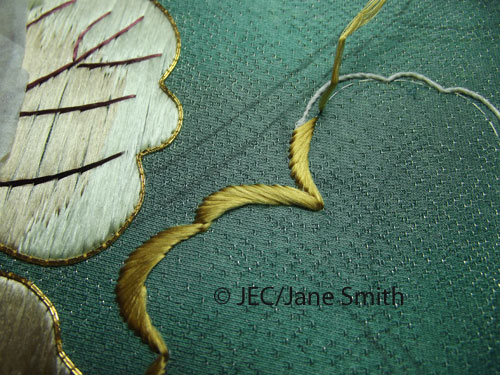
The third variation was a flat silk in a diagonal layer, Out came the couched padding and back in went the silk. I liked this much better and was able to shape the individual sections much more by starting the embroidery from different ends. I like the shapes this has created on each of the small curves.

This burgundy and green leaf is the 2nd biggest on the design, it took quite some time to get the foundation in. A thing to mention with this piece is how I've been working these very large motifs. The normal way would be as a satin stitch but these as so big that I'd waste metres of thread on the back of the motifs. Instead I've been working in 'floating stitch' as it's described in one of my books on early Japanese embroidery, each stitch comes up next to the one just completed, in a kind of back and forward pattern. It's worked well and saved huge amounts of silk. This leaf was embroidered using a 4-1T and even with this floating technique it took the best part of a reel of silk to complete the foundation.

The light green went in first, where the two colours join the darker colour is stitched though the green stitches.

All done and ready for its veins, I put in some temporary holding threads over the foundation and then transferred the lines of the veins using shell powder. I have blogged about using this before but it's been a while so I thought I'd document the process again. I gathered my equipment, a little water bottle with a dropper style top, these are the best kind as it's all too easy to put in too much water, my pot with shell powder, and a fine calligraphy brush. First trace the motif (in this case the outline of the leaf and its veins) onto the rough side of some tracing paper.

Next mix up the shell powder, a little powder goes a long way and once it's finished with just leave it to dry out in the pot ready to be used again. With just a couple of drops of water at a time I mixed up the shell powder into the correct consistency. As with lots of things JE related, experience tells you when this is right, in the text book it describes it as being like milk (we're talking the full fat creamy type here).
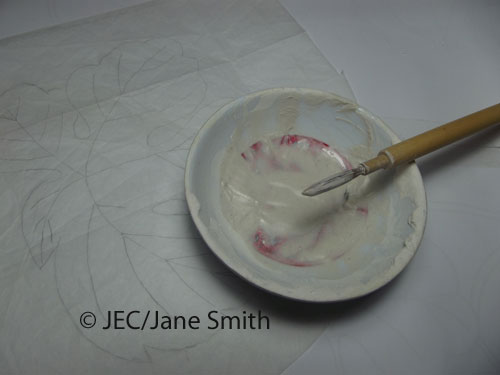
Next, paint as fine a line as you can get onto the smooth side of your tracing paper with the shell powder and leave it to dry.

Once the shell powder is dry place it over the motif and rub it gently to transfer the pattern. This picture shows the transfer the wrong way up but you can see that it's quite easy to see the leaf shape under the tracing paper so it's fairly easy to get the transfer in the correct place.

So here we are, one shell powder transfer on the foundation. It looks a bit messy but the shell powder does flake off and disappear.

The photo below shows how much the shell powder disappears once I started embroidering the veins. It stayed long enough for me to get all the veins in and any left will just flake off over time. I know lots of students of JE don't like using shell powder but I use it a lot and find it a very quick and easy method of creating a transfer.

So this takes me pretty much to where I was before I did some more this Sunday. Next time turning a blob into a leaf!
Keywords
Comments
On 20-01-2015 at 08:36, Carol-Anne Conway said:
Glad to hear that your mojo is returning, Jane. I liked the second version of the outline leaf but, as always, you're right, the thrird version balances with the large leaves better. This is going to be another stunning piece from you. I am looking forward to seeing your Fuzzy effect design for Module 8.
Latest blog entries
- Exciting news and updates
Sun 17 Nov 2024 - What happened to 2023?
Sat 03 Feb 2024 - Great Northern Contemporary Craft Fair
Thu 18 May 2023 - Long awaited update
Tue 31 Jan 2023 - A completed piece, progress, and events
Sat 11 Jun 2022